How To Create Free Email with own Domain using Google Apps
You can get your custom domain email address for free from Google apps. The process of getting your custom domain email address is simple. Here are few steps which you need to follow to get your personal domain email address.
There are 4 steps in the process of getting personalized free Email with your own domain:
- Create Personalized Email ID
- Change DNS for Google apps
1. Go to Google Apps page, and select from two options. If you already own a domain (Which is most likely, as you landed here), enter your domain name under “I already own this domain“. Else, you can also buy domain from Google for $10/year. Though, I prefer buying from other domain market places like NameCheap, Godaddy & ShoutMyDomain. Make sure you don’t add a www as a prefix or trailing slash (/) as prefix. In simple, it should be : domain.com
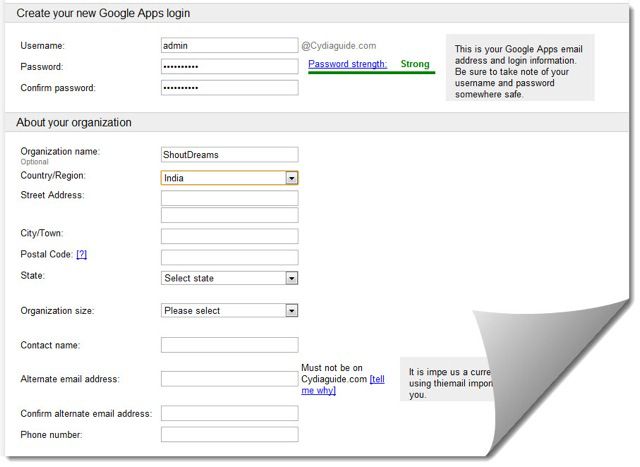
2. Once you click on Submit, You need to create a Google apps login. My suggestion is create one account with the name of admin@domain.com and later you can create account like name@domain.com. This will help in better management in future and managing and giving role to group. Specially, if you have a large organization, my suggestion would be go for admin. 3. When you fill out the detail, make sure your alternate Email address is not any temporary Email address, as this will be crucial at the time of password recovery. Once everything is done and you have accepted their TOS. Hit submit and you will be automatically logged into your personalized Email address account. Now, you can set up Google apps account any of the two method: Express or custom. For the sake of tutorial, lets go with Express set up.
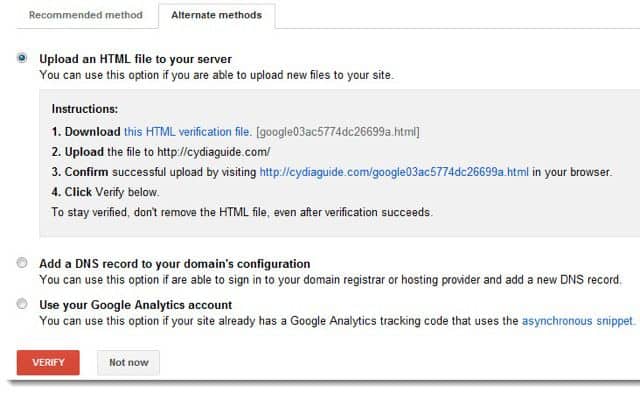
Verify Ownership for Google Apps Email:Now, this is the first part which is very important and after this you will be able to use your domain Email account to send or receive Email. Google has now made the verification process very easy by using Meta tag option. In which you have to add a code to your Website before < body> tag. If you are using WordPress, it will be easy else you can use alternate methods for verification. 1) Upload HTML file ii) Update DNS record iii) Google analytic verification. If you have bought the site from someone and he transferred the ownership of GA account, you can simply use it to verify Google apps ownership. Else, I prefer using HTML file upload method. So, using any of the method, verify ownership for the domain.
Setting up Google Apps Email account:
Once verification is done, rest set up steps are easy and you can get things up in minutes. Under Gmail > Set up Gmail you will get MX record to add the settings. If you are using a cPanel hosting like Hostgator, Bluehost. You can login to cPanel > Mail > Mx entry and Enter the following settings:
- Destination : ASPMX.L.GOOGLE.COM
Remove if there is any other Email entry. Upgrading MX record may take up to 48 hrs, so you continue with other Google apps set up and later on configure Google domain mail.
You can always access your domain Email dashboard by going to http://mail.google.com/a/domain.com If you want to change it to something like mail.domain.com, click on settings on top right > Email and change URL Now click on save changes and you are done with Google apps set up. Wait for sometime and one MX record has been propogated, simply start using your domain Email. I usually use forwarding feature to forward Email to my personal Email account and use the same account to send Email from professional account. Though, I will cover this tutorial later on. Or you can use Free software like Zimbra, which is a great feature rich Email account software.
 Make sure you don’t add a www as a prefix or trailing slash (/) as prefix. In simple, it should be : domain.com
 3. When you fill out the detail, make sure your alternate Email address is not any temporary Email address, as this will be crucial at the time of password recovery. Once everything is done and you have accepted their TOS. Hit submit and you will be automatically logged into your personalized Email address account. Now, you can set up Google apps account any of the two method: Express or custom. For the sake of tutorial, lets go with Express set up.
 If you have bought the site from someone and he transferred the ownership of GA account, you can simply use it to verify Google apps ownership. Else, I prefer using HTML file upload method. So, using any of the method, verify ownership for the domain.
 Upgrading MX record may take up to 48 hrs, so you continue with other Google apps set up and later on configure Google domain mail.
 Now click on save changes and you are done with Google apps set up. Wait for sometime and one MX record has been propogated, simply start using your domain Email. I usually use forwarding feature to forward Email to my personal Email account and use the same account to send Email from professional account. Though, I will cover this tutorial later on. Or you can use Free software like Zimbra, which is a great feature rich Email account software.
This is a great wordpress tutorial, thanks for sharing.
ReplyDeletenice tutorial .. really helpfull .
ReplyDeleteThanks for sharing this post. Its very helpful for me.
ReplyDeleteHow To Make email on your domain,Free email accounts for business,free email hosting
thanks :)
DeleteYour post is quite informative, The way you have explained each and everything is very simple & easy to understand.
ReplyDeleteus smartphone app developer